A ceiling leak after a snowstorm can feel confusing because it doesn’t always behave like a typical roof leak. The drip might start a day or two after the storm, show up in a room far from the exterior wall, or stop on its own when temperatures drop again. In many Boston-area homes, winter leaks are triggered by a mix of freeze/thaw cycles, attic conditions, roof-edge refreezing, and indoor humidity—not just “a hole in the roof.”
This guide is designed to help you do three things, safely and quickly:
- Protect people and prevent bigger damage in the first hour,
- Narrow down the most likely cause (roof issue vs. ice dam vs. plumbing vs. condensation), and
- Know when it’s time to worry—and why waiting can turn a small leak into a much bigger repair.
First 10 minutes: what to do before you diagnose anything
Treat electricity as your first safety checkpoint
If water is dripping near a ceiling light, fan, smoke detector, outlet, extension cord, or anything powered, don’t “test” it. Water can travel inside ceiling cavities and along wiring in ways that aren’t visible from the room. If you suspect the leak path is near electrical components, it’s often safer to shut off power to the affected circuit at the breaker panel and use a flashlight. This is especially important in older homes where wiring routes may be less predictable.
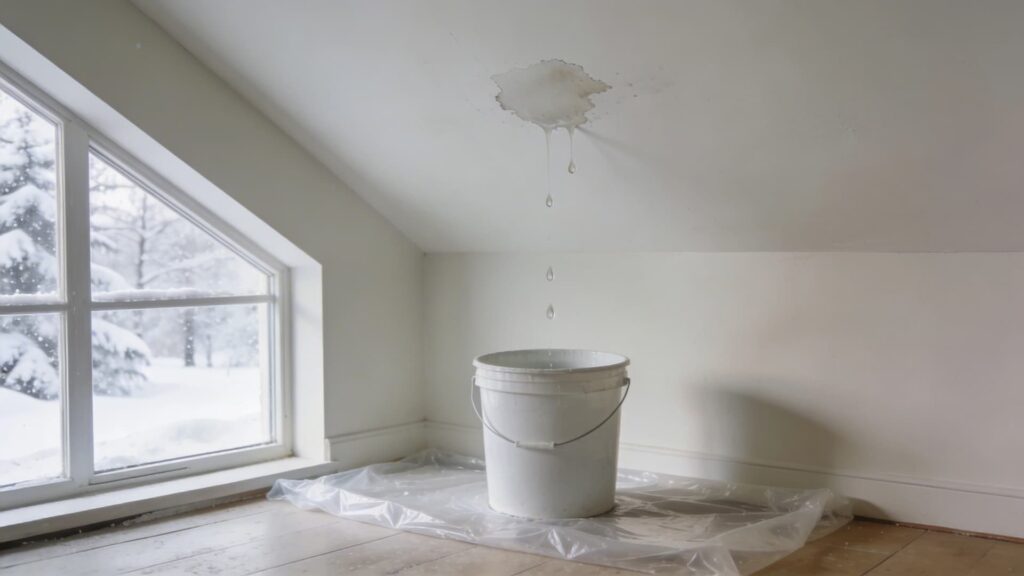
Contain water in a way that prevents secondary damage
A bucket stops the drip, but it doesn’t protect floors, trim, or subflooring from splash and seepage. A simple, high-impact setup is: plastic sheeting on the floor, an absorbent towel on top (to reduce splashing), and a bucket centered under the drip. If the leak is a slow “weeping” along a seam, you can guide water with a folded towel into the container—this prevents water from spreading across a wide area and soaking into floor seams.
Reduce humidity immediately—don’t wait for the ceiling to “dry on its own”
Winter leaks often create hidden dampness in insulation and drywall paper. The faster you lower indoor humidity, the easier it is to dry the space and prevent musty odors. A dehumidifier is more effective than a fan alone because it removes moisture from the air. If you don’t have a dehumidifier, increasing safe ventilation (without freezing pipes) can still help—especially if the room is getting clammy.
Document what you see while it’s fresh
Take photos of the stain, drip point, and any bubbling paint. Write down when the leak started, what the weather did (heavy snow, then a warm-up), and whether it changes during the day. This timeline becomes extremely useful later because winter leaks often come and go with temperature swings.
Why ceilings leak after snowstorms: the “big four” causes
A post-snowstorm ceiling leak typically falls into one of these categories. The key is that the timing and the pattern often tell you more than the size of the stain.
1) Roof-related leaks (flashing and penetrations are common culprits)
Not all roof leaks are from torn shingles. In winter, leaks often come from the “details”: flashing at chimneys, vent pipe boots, skylight flashing, valleys, and transition points where roof planes meet. Snow and wind can push moisture into small gaps, and then melting introduces water into assemblies that would stay dry in normal conditions.
What’s tricky is that a roof entry point might be several feet away from where the water appears inside. Water can follow decking seams, rafters, and insulation paths until gravity brings it down at a ceiling joint or low point.
2) Ice dams (winter-specific roof-edge refreezing)
Ice dams are a special mechanism that can cause leaking even if the roof is otherwise in decent shape. In simple terms, snow melts higher on the roof, refreezes at the colder eaves, and creates an ice ridge that blocks drainage. Water backs up and can slip under shingles. Ice-dam leaks often show up during warm-ups, then “pause” when temperatures drop again.
If you suspect a roof-edge ice ridge is driving the leak and you need the roof edge handled safely, safe ice dam removal is usually the most reliable next step.
(Note: This article stays general on purpose. Ice dams deserve their own dedicated guide because the wrong DIY approach can damage roofing and create safety risks.)
3) Plumbing leaks triggered by cold weather (not every winter drip is “the roof”)
Cold snaps can expose weaknesses in supply lines, fittings, and valves—especially in exterior walls, unheated areas, or poorly insulated sections. A pipe that’s partially frozen can crack, then leak slowly as it thaws. This can produce a ceiling leak that seems “storm-related,” when it’s actually a freeze/thaw plumbing event.
A helpful clue: plumbing-related leaks often correlate with water use (showers, washing machines, dishwashers) or appear under bathrooms and kitchens. If the leak becomes worse after someone showers, runs laundry, or drains a tub, plumbing moves higher on the suspect list.
4) Condensation that mimics a leak (humidity + cold surfaces = dripping)
Sometimes what looks like a roof leak is actually condensation. Warm indoor air holds moisture. When that moist air contacts a cold surface—like an attic roof deck, a poorly insulated ceiling corner, or a metal duct—it can condense into water droplets. In winter, this can happen above bathrooms, over poorly ventilated spaces, or where insulation coverage is uneven.
Condensation-driven dripping can be intermittent and may worsen when indoor humidity spikes (multiple showers, cooking, humidifier use) and outdoor temperatures remain very low.
How to narrow down the cause using “pattern clues” (without risky roof climbing)
Timing clues: when does it start and stop?
A leak that starts during a warmer day after a snowstorm and slows at night often points to a melt-driven source (roof meltwater, sometimes ice dams). A leak that appears after showers or laundry is more consistent with plumbing or bathroom exhaust issues. A drip that continues steadily regardless of temperature swings can indicate an ongoing roof entry point or a persistent plumbing problem.
Location clues: where is the stain relative to exterior walls and plumbing?
Ceiling stains near exterior walls can align with roof edge and attic conditions, but they can also come from window header leaks or condensation zones. Stains near the center of a home can still be roof-related because water can travel—so don’t over-trust “it’s not near the outside, so it can’t be the roof.” Instead, compare the stain location to what’s above it: attic space, bathroom, roof valley, chimney, or a vent stack.
Shape clues: ring stains vs. spreading patches vs. bubbling paint
A ring-shaped yellow/brown stain is often associated with a repeated wet/dry cycle where moisture seeped, dried, then seeped again. Bubbling paint and soft drywall suggests more active moisture and sometimes pooling above the surface. A scattered speckled pattern on a bathroom ceiling may be more consistent with condensation/humidity than bulk water intrusion.
Attic clue (only if safe): wet insulation or frosted nails
If you can check safely from the attic hatch without stepping onto unstable areas: wet insulation beneath a roof section suggests a leak path above it. Frosted nails or damp roof sheathing suggests humid air is reaching cold surfaces—often a sign of air leakage and ventilation problems that can worsen winter moisture issues.
What not to do (common mistakes that worsen damage)
Don’t crank heat and assume it “dries everything”
Heat can increase evaporation, but without moisture removal you may raise indoor humidity and spread that moisture into adjacent rooms and closets. Drying is more effective with balanced airflow plus dehumidification.
Don’t poke holes in ceilings unless you truly understand the risk
A bulging ceiling can hold significant water weight. Puncturing can release debris and water suddenly, and in older homes you may disturb materials you don’t want aerosolized. If the ceiling is sagging dramatically, treat it as a safety problem first—protect the area and arrange professional help.
Don’t chip ice off the roof edge or use random de-icing methods
This can damage shingles and flashing and is one of the fastest ways to turn a manageable winter issue into a roof repair. It’s also a major fall risk.
When to worry: red flags that should change your urgency
Electrical red flags
If water is near fixtures, outlets, or ceiling fans, or if you hear buzzing/crackling, treat it as urgent. Even if the drip is small, electricity and water is not a “wait and see” scenario.
Structural red flags
A ceiling that’s visibly sagging, cracking, or feels soft to the touch may be holding water above it. A sudden collapse can dump water and debris across a room. If you see significant bulging, prioritize safety and immediate containment rather than troubleshooting.
Rapid growth of staining or repeated re-wetting
A stain that expands during warm-ups and then pauses can still be dangerous because it indicates ongoing wetting of materials. Repeated wetting increases the chance of insulation saturation, drywall deterioration, and persistent odor.
Health sensitivity situations
If anyone in the home has asthma, severe allergies, COPD, or is immunocompromised, it’s worth being more proactive. Damp building materials can create irritants even before visible growth appears, and sensitive households often feel impacts sooner.
Drying basics that homeowners can do safely (and what “done” actually means)
Dehumidification is the cornerstone, not an optional extra
A dehumidifier lowers the moisture load in the air so wet materials can release moisture more effectively. Position it near the affected area, keep doors open if you’re drying multiple connected spaces, and run it long enough to see humidity drop into a stable range. If you own a hygrometer, it becomes much easier to avoid guesswork.
Airflow should support drying without spreading problems
Fans can help evaporation, but blasting air directly at a contaminated ceiling cavity or aggressively across wet drywall can spread dust and particles. Gentle room airflow paired with dehumidification is usually safer for homeowners.
Wet insulation is often the hidden reason leaks “come back”
Even after dripping stops, insulation above a ceiling stain can remain damp and continue to chill the area, creating a cycle where the ceiling re-wets during the next temperature swing. If you suspect insulation is wet or the affected area is significant, moisture verification becomes important—because surfaces can look dry while cavities are still damp.
If interior materials are wet and you want to reduce the risk of recurring stains and lingering musty odors, professional drying and moisture mapping after an ice dam leak can make a major difference after winter events.
Prevention for the next storm (without turning your home into a construction project)
Start with indoor humidity and ventilation habits
In winter, high indoor humidity increases condensation risk and can worsen attic moisture. Use bathroom fans during showers and run them long enough afterward to clear humidity. Make sure vents actually terminate outdoors (not into an attic). If you use humidifiers, monitor indoor humidity to avoid pushing moisture into cold ceiling surfaces.
Reduce heat loss pathways that feed winter roof problems
Many Boston homes have small but meaningful air leaks at attic hatches, recessed lights, and plumbing chases. Sealing obvious gaps reduces warm air entering the attic, keeps roof temperatures more consistent, and lowers the melt/refreeze pattern that drives many winter roof issues.
Keep roof drainage systems functional before deep winter
Clean gutters and make sure downspouts route water away from the house. Even when the main problem is roof-edge freezing, poor drainage can amplify winter moisture around the foundation and increase refreezing hazards at walkways and exits.

